How to Solve a Rubik’s Cube: The Beginner Method in 7 Steps
The layer-by-layer beginner method written out in full — seven steps, six short algorithms, and exactly how to hold the cube for each one.
Almost everyone who picks up a Rubik’s cube tries the same doomed thing first: solve one face, then the next, then discover that finishing the second face destroys the first. The cube does not work that way. Faces are not independent — every turn moves eight pieces at once.
The beginner method fixes that by solving the cube in layers rather than faces, from the bottom up, and by using short memorised sequences that move a piece into place without wrecking what you already finished. There are seven steps and six algorithms. The longest is eight moves. Most people get their first solve inside a couple of hours, and it takes about three minutes once the sequence is familiar.
This is the whole method, written out. Nothing is held back for a paid tier.
What you have to memorise
Six sequences, and one of them is four moves:
- R U R' U' — puts the bottom corners in
- U R U' R' U' F' U F — puts a middle edge in to the right
- U' L' U L U F U' F' — the same thing mirrored, to the left
- F R U R' U' F' — makes the yellow cross
- R U R' U R U2 R' — arranges the yellow edges
- U R U' L' U R' U' L — puts the last corners in the right places
- R' D' R D — twists a corner the right way up
That is genuinely all of it. Everything else is knowing which one to use and how to hold the cube while you do it.
First, how the cube is built
This part is worth thirty seconds because it makes the rest make sense.
A 3x3 is not 54 stickers that can move freely. It is 26 pieces of three kinds, and each kind is stuck with the colours it was born with:
- Six centres, one per face. They are attached to the core and they never move relative to each other. Turn a face all day: the white centre stays opposite the yellow one. This is the single most useful fact about the cube — the centres tell you what colour each face is meant to be. Green is always opposite blue, red always opposite orange.
- Twelve edges, two colours each. The white-and-red edge belongs between the white centre and the red centre. There is exactly one of it.
- Eight corners, three colours each. The white-red-blue corner has only one home, where those three faces meet.
So solving the cube is not colouring in faces. It is walking every piece home. Once a piece is home, your job is to not disturb it — which is exactly what the algorithms below are for.
The notation, in sixty seconds
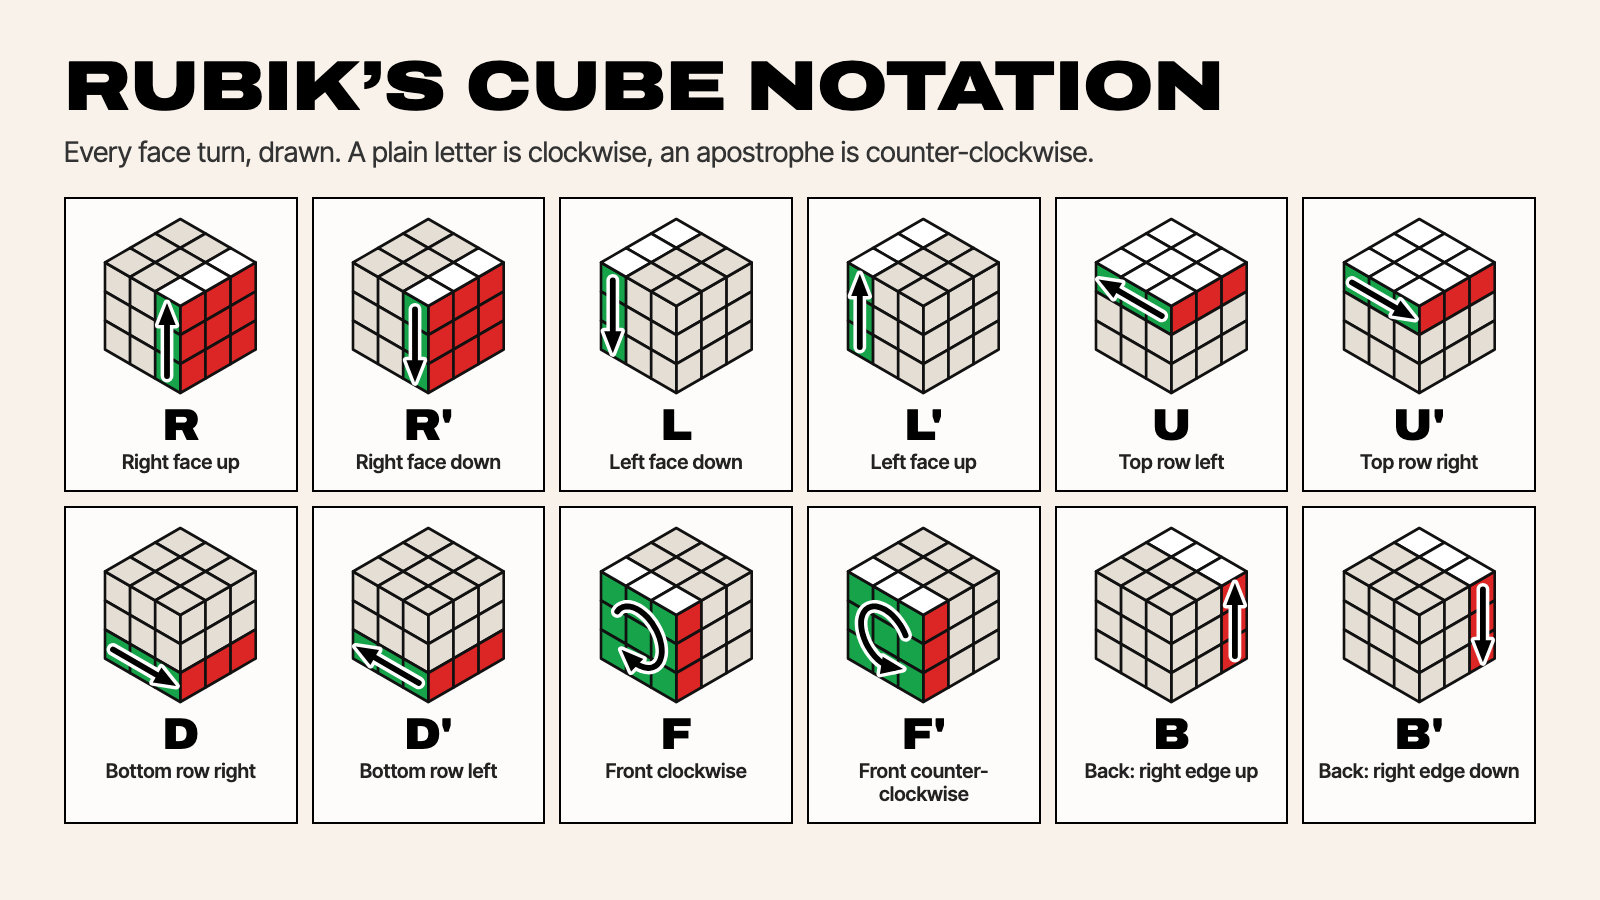
Algorithms are written with single letters, one per face, as seen from wherever you are holding the cube:
- R right face, L left, U up, D down, F front, B back
- A plain letter means a quarter turn clockwise, looking straight at that face
- An apostrophe (R', read “R prime”) means counter-clockwise
- A 2 (U2) means a half turn — direction does not matter
The two that catch everybody: B is clockwise as seen from behind the cube, so it looks counter-clockwise from where you sit, and D is clockwise as seen from below. If a sequence stops working halfway through, one of those two is usually why. We wrote a fuller guide here: Rubik’s cube notation explained.
Crucially: never rotate the whole cube in the middle of an algorithm. Pick your grip, keep the same face towards you, and only turn the layers the letters name.
Step 1 — The white cross
Hold the cube with white on the bottom and yellow on top, and keep it there for the rest of the solve.
The goal is four white edges around the white centre, with each one’s second colour matching the centre of the face it touches. That last clause is the bit beginners skip, and skipping it means the cross is wrong and step 2 will not work.
There is no algorithm here — it is the one step you do by feel, and messing it up costs you nothing. The reliable beginner route is the daisy:
- Find the four edges with white on them and bring each one to the top layer so the white sticker points up, arranged around the yellow centre. It looks like a daisy: yellow middle, white petals.
- Take one petal. Look at its other colour — say it is red. Turn the top layer until that edge sits directly above the red centre.
- Now turn that whole face twice (F2, or R2, whichever face it is). The white sticker swings down to the bottom and the red sticker lands against the red centre.
- Repeat for the other three. Turn the top layer between petals; never turn the bottom.
Finished correctly, the bottom shows a white plus sign, and each of the four side faces has a matching colour in its bottom-middle square.
Step 2 — The white corners
Algorithm: R U R' U'
Four corners to go and the bottom layer is done. Look in the top layer for a corner with white on it, and read its other two colours — blue and red, say. That corner belongs between the blue and red centres.
- Turn the top layer until that corner sits directly above the gap it belongs in — the top-front-right position, with the corner’s slot underneath it at bottom-front-right.
- Now just repeat R U R' U' until the corner drops in with the white facing down. It takes one, three, or five repetitions depending on how the corner is turned. Do it, look, do it again.
- Move to the next white corner. Same drill.
Two situations that look like problems and are not. If a white corner is already stuck in the bottom layer but facing the wrong way, put any top-layer piece above it and run R U R' U' once — it pops the corner out into the top layer where you can deal with it properly. And if the corner seems to leave and come back as you repeat, that is exactly what the algorithm does. Trust it and keep going.
At the end of this step the entire bottom layer is solved: a solid white face, and a matching band of colour around the bottom of all four sides.
Step 3 — The middle edges
Algorithms: U R U' R' U' F' U F (right) and U' L' U L U F U' F' (left)
Now the middle layer. You need four edges, and none of them has yellow on it — if an edge in the top layer has yellow on it, ignore it, it belongs in the last layer.
- Find a top-layer edge with no yellow. Say it is green and red.
- Turn the top layer until its front-facing colour matches the centre it is over. If the front sticker is green, park it over the green centre. You will see a vertical stripe of green: edge, centre, and the corner below.
- Look at the edge’s other colour — the one pointing up. Find that centre. If it is on the right, run U R U' R' U' F' U F. If it is on the left, run the mirror: U' L' U L U F U' F'.
- Repeat for the remaining three.
Stuck edge? If one of the four is already in the middle layer but flipped or in the wrong slot, put any top-layer edge over that slot and run either algorithm once. The wrong edge gets kicked out to the top, and you insert it properly from there.
Two of three layers are done. Everything below the top face is finished, and everything from here on has to leave it alone — which is why the last four algorithms are longer.
Step 4 — The yellow cross
Algorithm: F R U R' U' F'
Turn your attention to the yellow face on top, and look only at the yellow edges, ignoring the corners entirely. You will see one of four patterns:
- A dot — only the centre is yellow
- An L — two yellow edges meeting at a right angle
- A line — two yellow edges opposite each other
- The cross — all four, and you are done with this step
The algorithm walks you along that list: dot to L or line, L to line, line to cross. How you hold it matters:
- For the line, turn the top until it runs horizontally, left to right across your view. Run the algorithm once and you get the cross.
- For the L, turn the top until the two yellow edges point left and up — like the corner of a picture frame at the top-left. Run it, and you get the line. Run it again from the line position for the cross.
- For the dot, hold it any way you like and run it. You will land on an L or a line. Then follow the rules above.
Corners will look wildly wrong throughout. Ignore them completely — they get sorted in steps 6 and 7.
Step 5 — The yellow edges
Algorithm: R U R' U R U2 R'
You have a yellow cross, but the side colours of those four edges are probably not matched to their centres. This step swaps them around until they are.
- Turn the top layer and watch the four side stickers of the cross. You are looking for a position where at least one edge matches its centre — often two.
- If two match and they are next to each other, hold the cube so those two are at the back and the left. If two match and they are opposite each other, run the algorithm once from any angle; you will come back to the adjacent case.
- Run R U R' U R U2 R'. Look again, realign the top, and run it again if needed.
Two or three passes is normal. When you are done, all four edges of the top layer match their centres, and only the corners are left.
Step 6 — Put the last corners in the right places
Algorithm: U R U' L' U R' U' L
This step gets each corner to the right spot without caring which way up it is. A corner is in the right spot when its three colours match the three centres around it — even if it is rotated.
- Scan the four top corners and find one that is already home. Hold the cube with that corner at the front-right of the top layer.
- Run U R U' L' U R' U' L. The other three corners cycle around it.
- Check again. Repeat until all four are in place — usually once or twice.
If no corner is home to begin with, run the algorithm once from any orientation. One will appear. Then hold that one at front-right and continue.
Step 7 — Twist the last corners
Algorithm: R' D' R D
Every piece is now in its correct position and some corners are just rotated the wrong way. This is the step where people panic, so read the warning first.
The cube is going to look completely destroyed in the middle of this step. That is normal. Do not stop. Do not try to fix it. Everything comes back the moment the last corner is twisted.
- Hold the cube so a corner needing a twist is at the top-front-right.
- Repeat R' D' R D — always two or four times — until that corner’s yellow sticker points up. Then stop, even though the rest looks wrong.
- Turn only the top layer (a U turn) to bring the next unsolved corner to that same top-front-right spot. Never rotate the whole cube.
- Repeat R' D' R D on that one. Continue around until every yellow corner sticker faces up.
When the last one clicks, the mess resolves itself. A final turn or two of the top layer to line it up, and the cube is solved.
How long this takes
A realistic first day: an hour or two to get through the seven steps with the algorithms on screen next to you, with two or three restarts because a white cross was built without matching the side colours. Second solve, twenty minutes. By the tenth solve most people are around three minutes and no longer reading the steps.
The beginner method takes roughly 100 to 160 moves. For comparison, the optimal solution for a scrambled cube is about 20. That gap is the whole of speedcubing, and none of it matters until you can finish reliably.
Where people actually get stuck
- The white cross has matching side colours only sometimes. This is the number one cause of “step 2 doesn’t work”. Check all four before moving on.
- Rotating the whole cube mid-algorithm. R means the right face of the grip you started in. Turn the cube in your hands and every following letter means something different.
- B and D turned the wrong way. Both are clockwise as seen from that face, which is the opposite of what your hand wants to do.
- Giving up during step 7. The cube looking broken is a required stage of R' D' R D, not a mistake.
- Trying to solve one face at a time. A solved white face with a jumbled band under it is not a solved layer, and no algorithm here will save it.
After your first solve
Once you can finish without notes, three things make you faster, in this order: stop looking at the algorithms, plan the white cross before you start turning, and start timing yourself. A timer with proper scrambles and an average of five is what turns random practice into visible progress — you stop chasing one lucky solve and start watching your average fall.
The next real step after that is replacing step 2 and step 3 with the pair-based approach used in the CFOP method, which cuts the move count roughly in half. But that is a much later problem. Getting from “never solved it” to “can always solve it” is the achievement here, and the seven steps above are enough for that.
Learning it with the app
We built Cube Solver: Scan & Solve 3D around exactly this method, because reading algorithms off a page and executing them on a cube in your hands are two different skills.
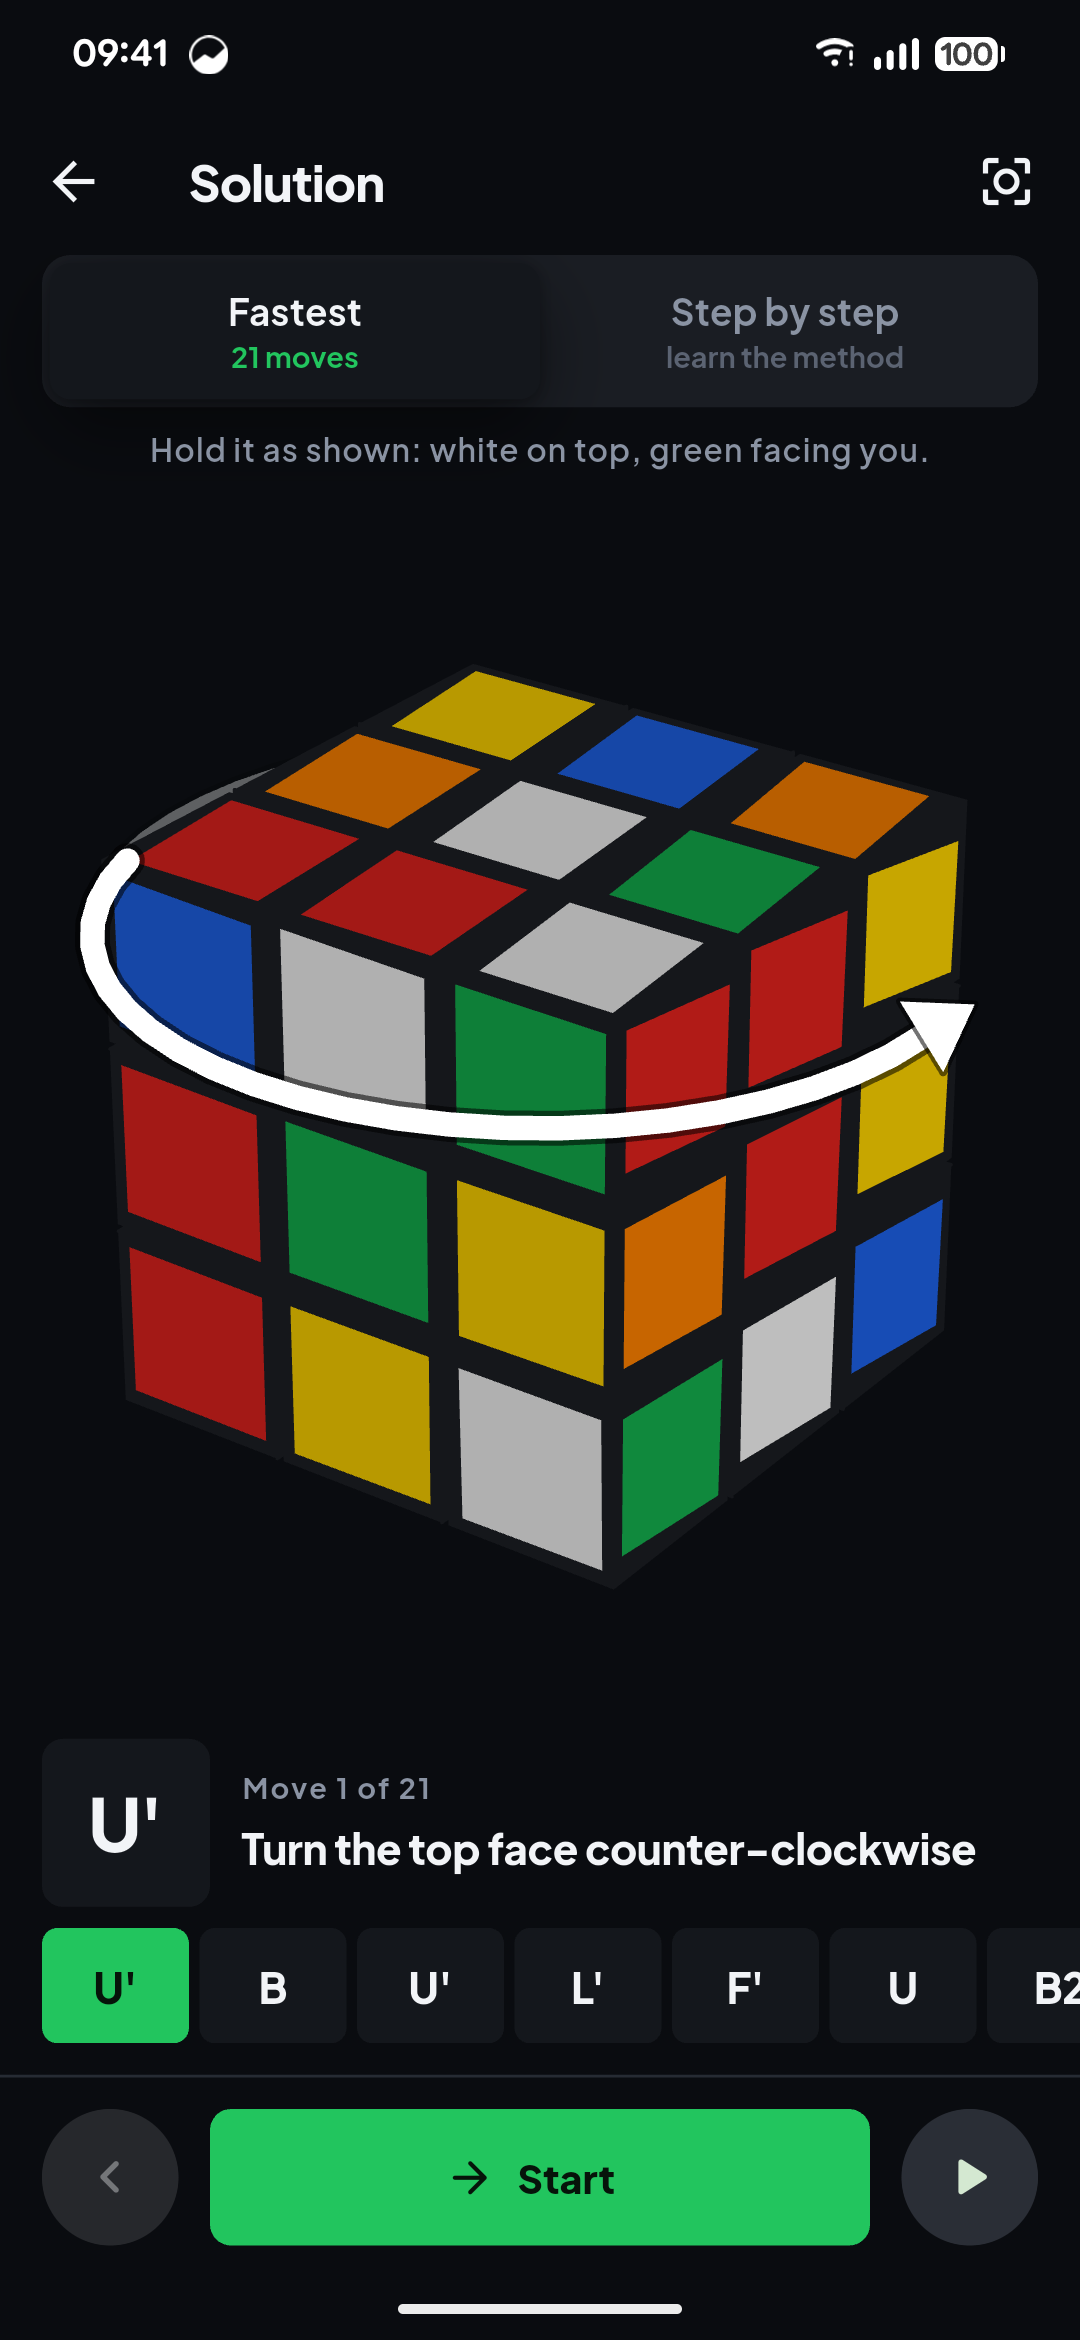
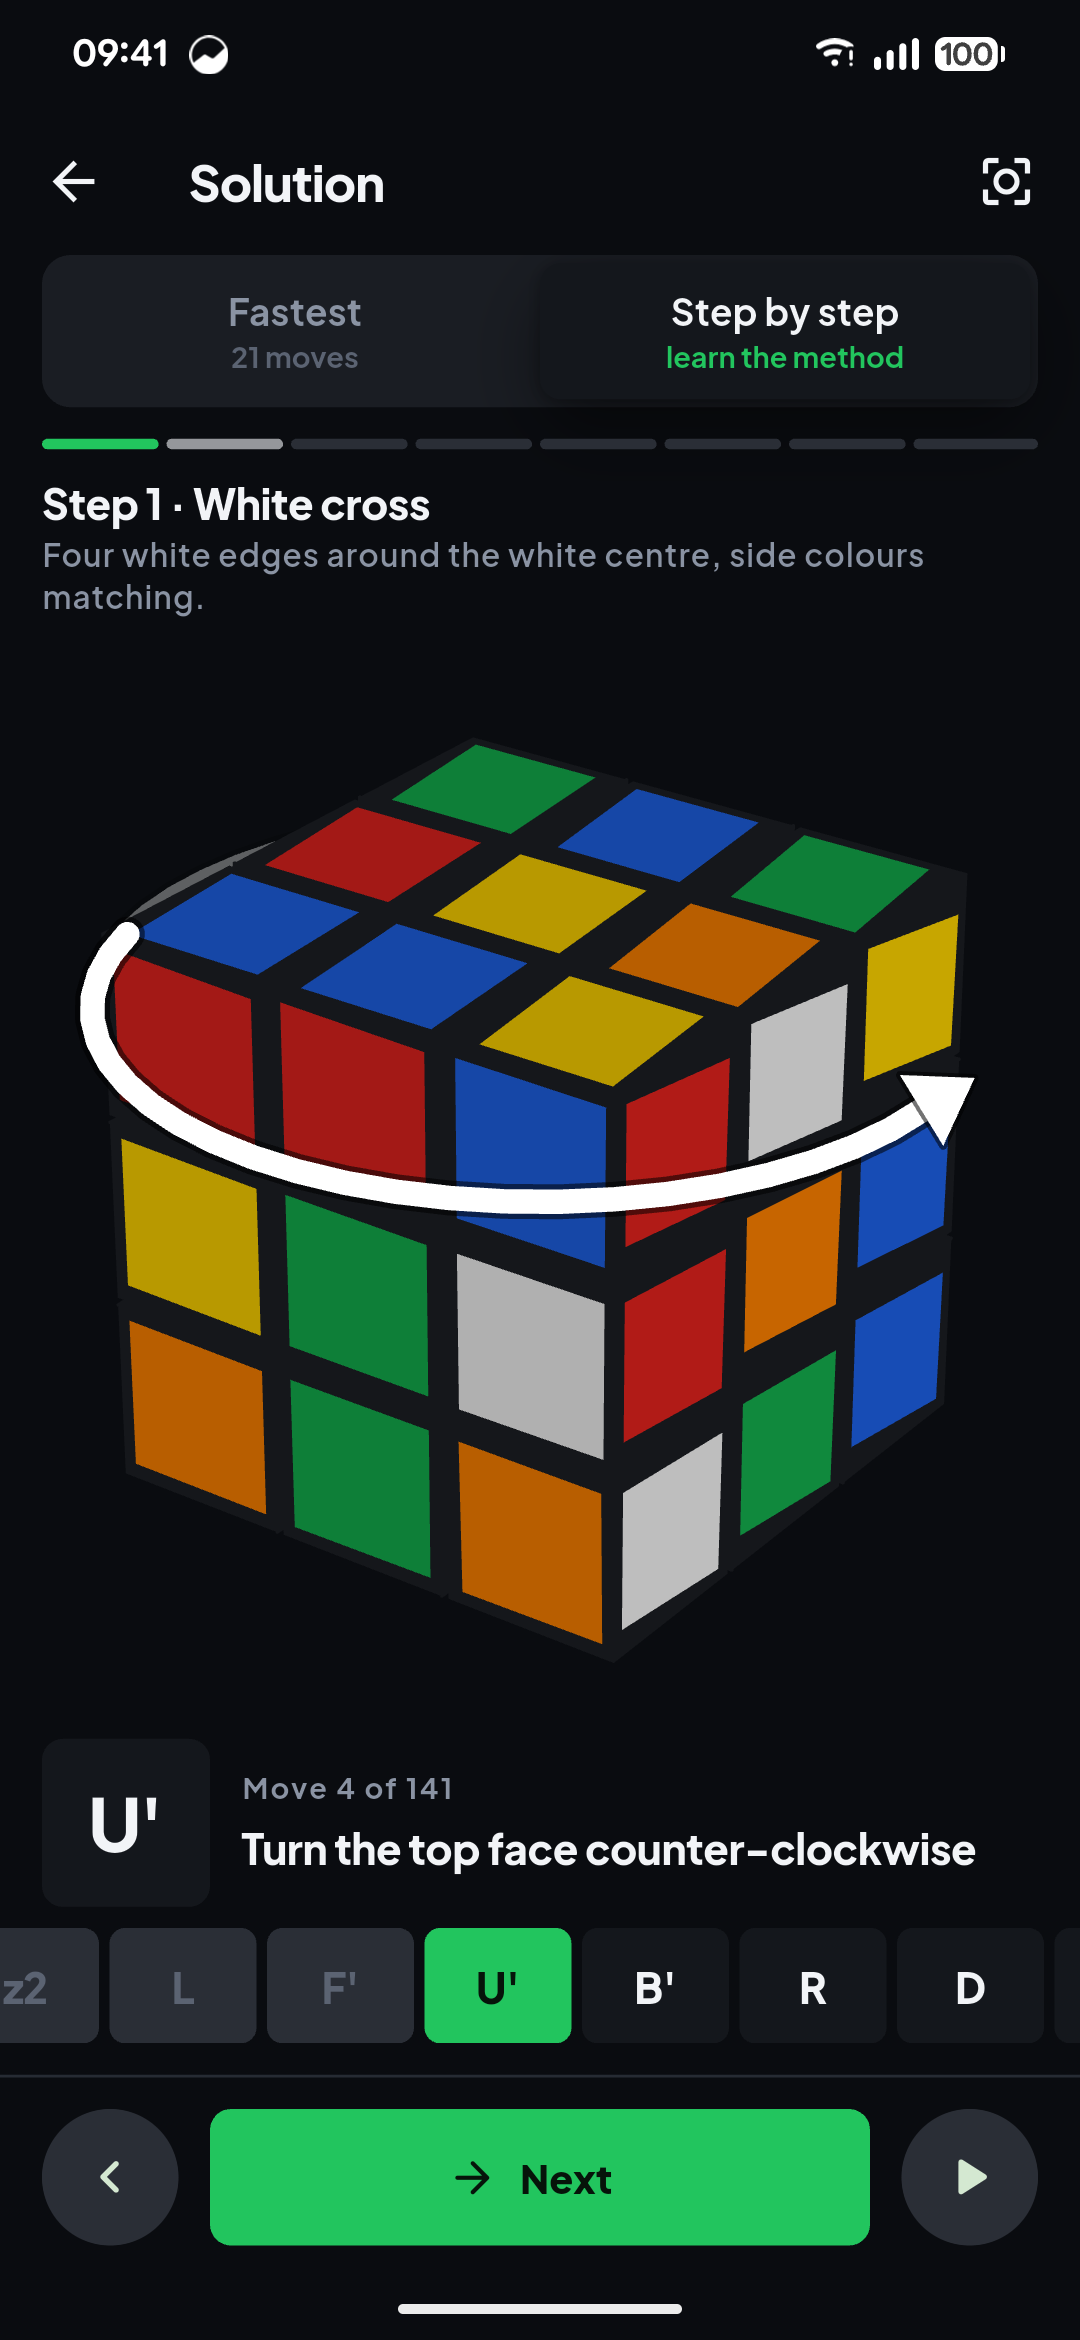
Scan your scrambled cube with the camera, or tap the colours into a grid, and you get two solutions to the same cube. Fastest gives you the shortest route, around 20 moves, animated on a 3D cube with an arrow drawn around the exact layer that turns. Step by step solves that same cube with the beginner method above, stage by stage — the white cross, then the corners, then the middle edges — so you are practising the real method on your own cube rather than copying moves you will never remember.
The Learn tab holds the same seven steps as swipe-through cards with each algorithm animated, plus a notation deck and, for later, a timer with scrambles and an average of five. It works offline, there is no account, and every step of the method is free. Ads pay for it, and a single one-time purchase removes them.
The short version
Solve the cube in layers, not faces. White cross, white corners, middle edges, yellow cross, yellow edges, corner positions, corner twists. Six algorithms, the longest of them eight moves, and one rule that saves most beginner solves: keep the same face towards you for the whole of an algorithm.
Then go and do it on the cube in your hands: Cube Solver: Scan & Solve 3D.
From the studio
Previous Article
75 Soft Challenge Rules: The 4 Rules, What Counts, and a Free Checklist
Next Article
Rubik’s Cube Notation Chart (Free PDF): What U2, R' and x Mean